Contact Form 7
Contact Form 7 is the most popular plugin for creating forms on WordPress sites. It is actively maintained and has a lot of advanced features as well as addons and informational resources from the plugin author as well as the community.
The plugin allows you to use custom markup when creating your contact forms. Chap theme also includes some CSS to convert the messages that Contact Form 7 outputs to use Semantic UI styles.
Using shortcodes
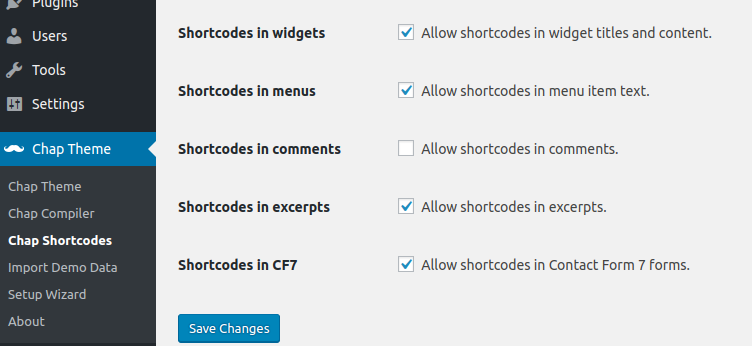
Chap Shortcodes can be used to create a good looking and responsive contact form. Chap Shortcodes come with an option to enable the use of shortcodes in Contact Form 7 forms.
<ui form>
  <field label="Your Name">
    <text* your-name>
  </field>
  <field label="Your E-mail">
    <email* your-email>
  </field>
  <field label="Subject">
    <text your-subject>
  </field>
  <field label="Your Message">
    <textarea your-message>
  </field>
  <submit class:ui class:primary class:button "Send">
</ui>
Using HTML
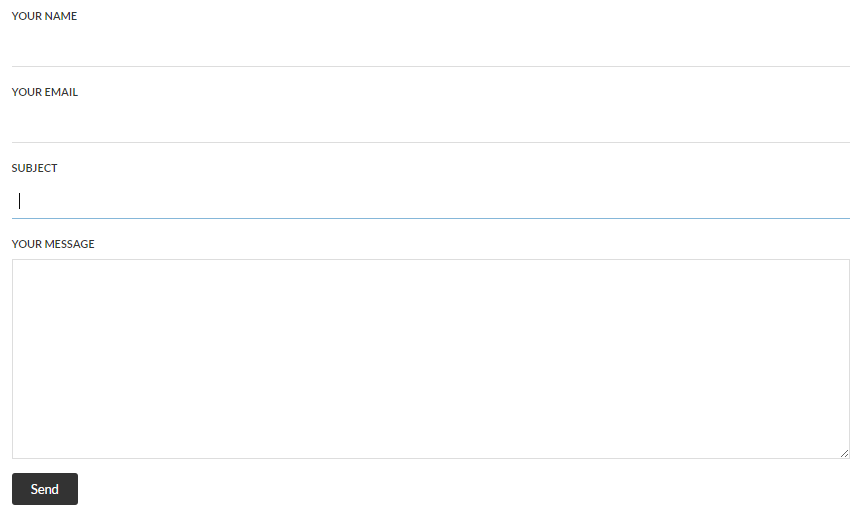
Another option to create a good looking CF7 form is by using plain HTML while taking advantage of Semantic UI CSS classes available in Chap.
<div class="ui form">
  <div class="field">
    <label>Your Name</label>[text* your-name]
  </div>
  <div class="field">
    <label>Your Email</label>[email* your-email]
  </div>
  <div class="field">
    <label>Subject</label>[text your-subject]
  </div>
  <div class="field">
    <label>Your Message</label>[textarea your-message]
  </div>
  [submit class:ui class:primary class:button "Send"]
</div>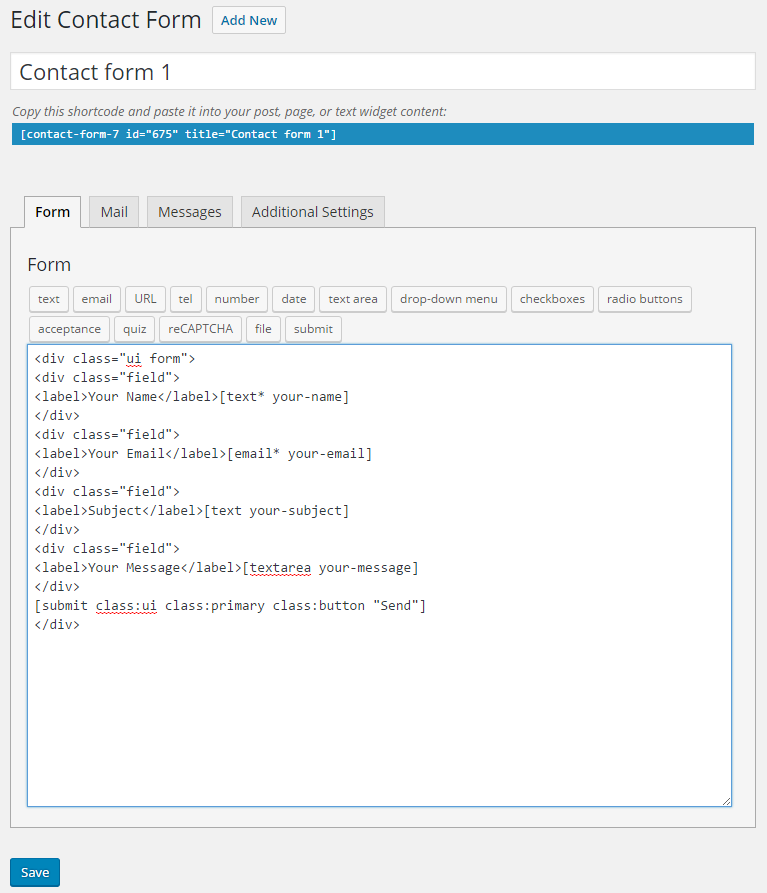
Displaying the form
To display the contact form the [contact-form-7] shortcode should be placed into post content. The shortcode with the correct ID will be displayed above the form editor.
<contact-form-7 id="123" title="Contact form 1">AMP behavior
On Accelerated Mobile Pages the form won’t be functional so it should be hidden and can be replaced with a button that directs the user to the main website page where the form can be used. To achieve this CSS helper classes .amp-invisible and .amp-only can be used. Adding these classes to regular HTML will visually hide the content, while if a shortcode has that class it won’t be rendered at all when applicable.
<span amp-invisible>
  <contact-form-7 id="123" title="Contact form 1">
</span>
<button primary amp-only right labeled icon icon="mail forward" url="/contact">Go to contact form</button>Submit button
While the default CF7 submit shortcode can use Semantic UI classes, such as:
<submit class:ui class:primary class:button "Send">there is no way to create more advanced Semantic UI buttons (with icons or labels) using it.
How ever, it’s possible to submit the form with a regular button[type="submit"] so instead of using the CF7’s [submit] shortcode for the button, a Chap shortcode with CF7 classes can be used instead:
<button primary right labeled icon wpcf7-form-control wpcf7-submit type="submit" icon="send">Send</button>Although this approach may have issues with other Contact Form 7 addons or advanced features that rely on the presence of the actual CF7 submit button, which is an input[type="submit"] not a button.
Checkboxes & radio buttons
Contact Form 7 checkboxes and radio buttons are not compatible with Semantic UI out of the box. If you wish to use them then some JavaScript can be used to manipulate them first.
document.addEventListener('chap_ready', function() {
  (function($) {
	$('.wpcf7-checkbox, .wpcf7-radio').each(function() {
	  $(this).find('.wpcf7-list-item').addClass('field');
	  $(this).find('input[type="checkbox"], input[type="radio"]').each(function() {
		var parent = $(this).parent();
		var label = parent.find('.wpcf7-list-item-label');
		var radio = $(this).attr('type') === 'radio' ? ' radio' : '';
		label.replaceWith('<label>' + label.html() + '</label>');
		parent.replaceWith('<div class="ui' + radio + ' checkbox">' + parent.html() + '</div>');
	  });
	});
  })(jQuery);
});
This allows to use checkboxes and radio buttons with the use_label_element option enabled.
<ui form>
  <fields grouped>
    <field label="Checkboxes" />
    <checkbox checkbox-27 use_label_element "Option 1" "Option 2" "Option 3">
  </fields>
  <fields inline>
    <field label="Radios" />
    <radio radio-72 use_label_element default:1 "Option 1" "Option 2" "Option 3">
  </fields>
  <submit class:ui class:primary class:button "Send">
</ui><div class="ui form">
<div class="grouped fields">
<label>Checkboxes</label>
[checkbox checkbox-27 use_label_element "Option 1" "Option 2" "Option 3"]
</div>
<div class="inline fields">
<label>Radios</label>
[radio radio-72 use_label_element default:1 "Option 1" "Option 2" "Option 3"]
</div>
[submit class:ui class:primary class:button "Send"]
</div>Saving input

Flamingo is a great plugin that allows to save all Contact Form 7 entries to the WordPress installation database, allowing you to see them even if the mailing function has malfunctioned. All you need to do is install and activate the plugin and then a Flamingo menu item will be displayed in the WordPress admin dashboard, which will contain saved entries from all forms.
Asset optimization
By default Contact Form 7 loads the CSS and JS assets on every page, regardless of whether or not it contains a form. If your site only has 1 form on a contact page, then it’s recommended to disable loading these assets on other pages.
This can be achieved by adding an action to child theme’s functions.php that determines when the assets should be loaded:
/**
 * Disable Contact Form 7 assets on non-contact pages.
 */
add_action('wp', function() {
	if(!in_array(get_the_ID(), [20])) {
		add_filter('wpcf7_load_js', '__return_false');
		add_filter('wpcf7_load_css', '__return_false');
	}
});
The above snippet prevents loading the CF7 assets when the current page ID is not 20. This value should be changed to your page ID, and additional ID’s can be added to the array. Additionally other conditionals can be used to determine when the assets should be unloaded, such as is_single() or is_page(), by modifying the if statement.
It’s also possible to unload Google reCAPTCHA (v3) assets with the following lines:
wp_dequeue_script('google-recaptcha');
remove_action('wp_enqueue_scripts', 'wpcf7_recaptcha_enqueue_scripts');
but it’s questionable whether it’s wise to do that, because v3 reCAPTCHA may monitor user activity on other pages to determine whether or not the client is a bot.
Demo forms
<ui form>
  <field label="Your Name"><text* your-name></field>
  <field label="Your E-mail"><email* your-email></field>
  <field label="Subject"><text your-subject></field>
  <field label="Your Message"><textarea your-message></field>
  <submit class:ui class:primary class:button "Send">
</ui><ui form>
<fields two>
<field label="Your Name"><text* your-name></field>
<field label="Your E-mail"><email* your-email></field>
</fields>
<field label="Subject"><text your-subject></field>
<field label="Your Message"><textarea your-message></field>
<submit class:ui class:primary class:button "Send">
</ui><ui small form primary segment>
<field label="Your Name"><text* your-name></field>
<field label="Subject"><text your-subject></field>
<field label="Your Message"><textarea your-message></field>
<submit class:ui class:primary class:button "Send">
</ui><ui form inverted segment>
<field label="Name">
<fields two>
<div field><text* first-name placeholder "First name"></div>
<div field><text* last-name placeholder "Last name"></div>
</fields>
</field>
<field label="Billing address">
<fields two>
<div twelve wide field><text* first-name placeholder "Street Address"></div>
<div four wide field><number shipping-2 placeholder "Apt #"></div>
</fields>
</field>
<field label="Your Message"><textarea your-message></field>
<submit class:ui class:large class:inverted class:button "Order">
</ui>Themes
The forms will be styled according to your chosen form and button themes that can be configured in the theme options at Chap Theme -> Themes.